The internet is an incredible avenue for learning, providing an endless array of opportunities. Digital courses are popular and rightly so. They’re an amazing way to deliver your message to a wide audience, and also an effective way to build your list. In this post, you’ll learn how to create online courses with Thinkific, the number one platform for creating, marketing and selling online courses.
![]()
Table of Contents
What Is Thinkific?
Thinkific is a learning management system that enables users to create online courses either from scratch, using their drag-and-drop editor and pre-made templates, or to convert existing webinars and other content, into course curriculum. Once a course is created, the web-based service houses all content, while providing functionality to manage course communities.
Download their free membership guide here.
Benefits Of Thinkific
- Convenient drag-and-drop editor
- Wide range of features, such as course templates
- No coding experience required
- Customize curriculum to match your brand
- No technical issues to worry about
- Courses help build your business and brand
- Use the Site Builder to design your own course website
- Create home, sales, and landing pages
- Integrate your site with an existing website
- Use the bulk importer to upload video and audio
- Free account available
- Outstanding training and support
This post contains affiliate links, which means I may receive a small commission, with no cost to you, if you make a purchase through a link.
How To Create Online Courses
1. You can either upload an existing video to Thinkific or create one from scratch. I’ll be demonstrating how to create one from scratch.
2. On the homepage, click the yellow tab that says “Get Started Free.” Create your account by filling in some general information. When you’re done, click “Create your account.”
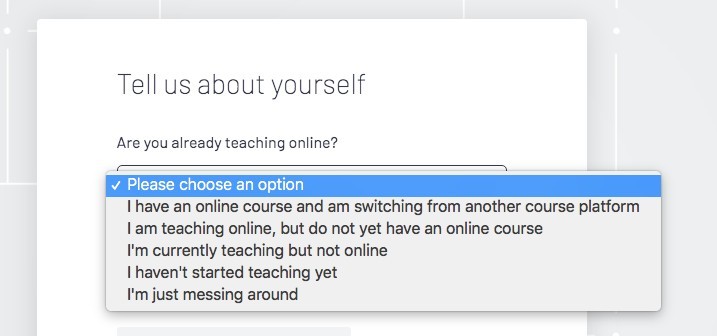
3. Choose the options from the drop down menu:

I chose “I am teaching online, but do not yet have an online course,” “Not yet, I’m just starting out,” and “Author/Blogger. Select the options that best apply to your situation.
Click “Start creating courses:”
3. You’ll now see a welcome screen with options to create a course outline and share a landing page for your first course. Click the “Get Started” button.
4. Name your business. You can change the name you’ve selected at any time. Press “Next.”

5. Now name your course. I’m naming mine “Wealthy Affiliate” because I want to create a course that outlines the advantages of the company’s online certification course for affiliate marketers. Again, you can change the course name at any time.
You’ll now see a screen with the phrase: “A world-class student experience” with a quick tutorial. Press “Next.”
6. Choose a course template according to the industry you’ve selected. My options are a “Mini-Course” or “Flagship.” Mini courses are free, or low cost, to create. The intention of my course is to build my email list. Mini courses are great lead magnets or to generate leads for coaching services.
Determine the purpose behind your course and how you’re going to leverage your content. Do you want to capture emails or is it a revenue-based course? I can also select the “Flagship” option where I can create an entire online course using a robust curriculum outline. Note the sample outline on the screenshot below: Press “Next.”

7. Now you’ll see a screen where you can confirm your course name, and make some small tweaks to the image that has been generated. Note the name of your business at the top. Change the colors and banner image if you’d like. Play around with the different options until you come up with something you love.
![]()
8. Next, you’ll be taken to a screen that says “Congratulations!” Now that your first site is completed, you can share it directly to Facebook, LinkedIn, or Twitter. Click the “Share Your Site” button if you’d like to share or copy the link to use later. Press “Continue to Thinkific.”
9. Click “Manage Learning Content” then “Course” in the drop down on the left side of the editor. This is where you can edit your existing courses, customize your website URL, connect a payment processor, and upgrade to a premium plan. Click “Tour” to watch the explanatory video.
Click “Edit” underneath the icon with the three dots.
10. It’s time to get into the nitty gritty work of designing your course. Click “Curriculum.” The interface is structured with pre-made templates, which are individual chapters or modules that you’ll want to populate with content. Click the “+ Add Lesson” button for customization options.
Use the “Bulk Importer” to upload audio and media, the “Settings” tab to edit your course name and URL, and the “Drip” tab to schedule the content of your course to be scheduled over time. In the “Pricing” section you can choose to offer the content for free or for a one-time payment. The system integrates with several payment options, including PayPal and Stripe. If you’re offering a free course, you can give your audience an unlimited access link.
This is also the area where you will publish your course. Premium members have the option to offer learners a certificate or a custom completion page. Add assets, such as videos, text, surveys, PDFs, audio, assignments, exams, presentations, quizzes, and multimedia. Whatever option you add to the template will be editable in the middle of the editor. Adding a text asset is basically adding an entire webpage in which you can add additional media. .
For instance, if I want to add a presentation, I’ll see this screen where I can select a PDF to upload:

Continue editing the various templates in your course by dragging audio, video, text, and other applicable data into each template. Add additional lessons as needed. You can add new chapters at the bottom of the template section. Remember to preview your course and save it periodically.
Upon previewing your course, press “Complete and Continue” after you’ve finished editing each template. If you’re happy with how your course looks, press “Publish.” Your course will be saved on your dashboard for easy reference. It’s astounding the variety of courses you can create with Thinkific. You can also design landing pages, complete with customization options, including typography, colors, styles, and favicons.
Pricing
Thinkific has four pricing plans. The free plan includes three courses, unlimited students, quizzes and surveys, and content hosting. It’s a good way to test drive the core features to see if the platform is right for you. Compare plans here to see which one best fits your needs.
Building An Online Business
![]() If you’re new to the online world, and are interested in building a long-term business, read my review or click on the banner to the right to learn more.
If you’re new to the online world, and are interested in building a long-term business, read my review or click on the banner to the right to learn more.
[Read More: Is Wealthy Affiliate The Real Deal?]
In my opinion, and from my own experience, Wealthy Affiliate is the best platform out there for marketers who are looking to build a thriving business on the internet, and invest in their financial future.
Key Points

I hope you enjoyed this brief tutorial. I barely skimmed the surface of what’s available, but at least you have a basic understanding of how Thinkific works. Don’t let online courses intimidate you. Get started with Thinkific for free today. You’ll be glad you did…
Have you created an online course? If you haven’t, would you like to? Let me know in the comments:)


Hey Holly,
I have been in the process of writing an online course and have been checking out a number of platforms to share it on. I have only recently come across Thinkific and wanted to know a little more. I know I have a dilemma on my hands, as I was originally going to post my course to Udemy. Which do you think is the better platform to post a course aimed at teaching beginners all about affiliate marketing? Any advice would be great. Thanks!
Hi John,
Thanks for reading my post. I like Thinkific because it’s affordable and has a great drag and drop editor. You can also take advantage of the free account to get a feel for how the system works. And you’ll have more freedom with Thinkific to brand your course.
One downside to Udemy, is they take up to 50% of your course revenue in exchange for hosting. Conversely, Thinkific doesn’t charge transaction fees if you have a business account. They will, however, charge 10% if you’re using the free plan.
Another perk of Thinkifc is you have access to your funds quickly, whereas with Udemy, you typically have to wait two to three months before the money hits your account.
Best of luck to you in the course-creation process!
I have learned that making an online course is a good way to make money and generate leads, I have known this, but I have not found a good place to build and host my courses. Your review of Thinkific has really helped me and is timely.
The pricing options are good, and I like that you have given a step-by-step guide on how to create a course, complementing your review with pictures. Thanks!
Hello,
Yes, creating online courses is a great way to build an email list, and generate leads and revenue. They’re also great for brand awareness. Give Thinkific a try. You can create three courses with a free account to see how the system works. Thanks so much for reading and commenting!